Note: Ideally, you should already have a site in IIS configured with a certificate. Read this and this on how to obtain certificates. Please read this for how to add a certificate to a site. You will also need a second certificate (or the same one for the purposes of this exercise) for use as the service certificate. This should be installed in the LocalMachine certificate store. Once you have the service certificate, copy the thumbprint and keep it for use later
Copy service certificate thumbprint
On the machine hosting the WCf service, open the Microsoft Management Console (Click Start, type mmc in the search field and enter). Click on File and click on Add/Remove Snap-in…

Click on ‘Certificates’. Click on ‘Add’

Make sure ‘Computer Account’ is selected and click on Next. ‘Local computer’ should be selected by default on the next screen. Click finish to view the certificates installed on the computer


Open the Personal folder and right-click the Certificates folder to see the certificates installed on the LocalMachine. Double-click the certificate you wish to use, go to the ‘Details’ tab and click on ‘Thumbprint’. Copy the thumbprint value and paste it in a new notepad file. Remove all the spaces between the characters (Paste the thumbprint in Notepad, click on edit, replace, hit the spacebar and click on replace all to remove all spaces) and save the file somewhere for later use (this will be used in BizTalk later)

You now need to make the certificate available to the WCF host process (see this msdn article for an explanation of the scenarios in which you would need this). Click OK to go back to the personal certificates store, right-click on the certificate, click on ‘All Tasks’ and click on ‘Manage Private Keys’

In the next window, click on ‘Add’, and type in the BizTalk service account that will run the WCF service process (basically the applicaiton pool user) in the format <domain\user>. Click ‘Check Names’ to get the user credentials and click OK to add the user.

Click on the newly added user . In the permissions window, untick the ‘Allow’ box next to the Full Control permission. Make sure the Read permission box is ticked

Click Apply. Click OK and close the mmc window. Save the mmc snap-in as ‘cert’ when prompted in case you need to use the snap-in at some other time. It will save in the Administrative Tools folder by default so you can open it from there at some other time
Create a BizTalk WCF service (You can do this using the BizTalk WCF Service Publishing Wizard). Whilst creating the service, make sure you create a BizTalk receive location in the BizTalk Application that will be implementing your service. Also publish the WCF service into a site configured for SSL and change the application pool for the application (not the site) to an application pool using the user you granted permissions to earlier. In this case, my WCF service has been published into the default website, which has been bound with a certificate for SSL. See msdn for instructions on adding a certificate to a site
Open IIS Management Console (Usually Start , Administrative Tools, Internet Information Services (IIS) Manager). Open the site hosting your WCF application (e.g. Default Web Site). Right-click on the application and click on 'Explore'. This should take you to the application/service folder.

Open web.config in a text editor like Notepad (or Notepad++ ideally). Make a slight modification to the ServiceModel section by changing the httpsGetEnabled attribute of the serviceMetadata node from false to true as shown below.
<system.serviceModel>
<behaviors>
<serviceBehaviors>
<behavior name="ServiceBehaviorConfiguration">
<serviceDebug httpHelpPageEnabled="true" httpsHelpPageEnabled="false" includeExceptionDetailInFaults="true" />
<serviceMetadata httpGetEnabled="true" httpsGetEnabled="true" />
</behavior>
</serviceBehaviors>
Save and close the file. Close the IIS Management console.
Open the BizTalk Management Console (Start à All Programs à Microsoft BizTalk Server 2010 à BizTalk Administration)
Browse to the receive location that will be implementing your service endpoint

Open the receive location and click on ‘Configure’.

The endpoint URL should already be there. Click on the ‘Binding’ tab and select ‘WSHttpBinding’ from the binding dropdown
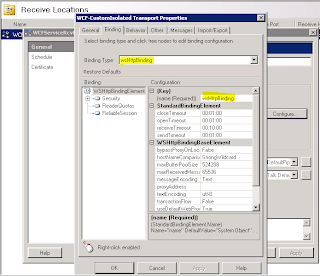
Click on ‘Security’ and select ‘TransportwithMessageCredential’ as the security mode
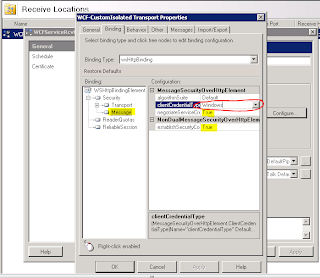
Open the security options node, click on ‘Transport’ and select ‘Certificate’ as the ClientCredentialType
Click ‘Message’ and the default ClientCredentialType of Windows should be selected. (If you have non-repudiation requirements, 'Certificate' clientCredentialType should be selected here instead of Windows. this will also require using a certificate for the client when the service is called). Also make sure negotiateServiceCredential and establishSecurityContext are set to true if you wish to use secure sessions for SCTs. For the sake of this exercise, set them to true
If you have a reliable messaging requirement, Click on ‘ReliableSession’ and make sure ‘enabled’ is set to true

Click on the ‘Behavior’ tab. Right-Click on ‘ServiceBehavior’ and click on ‘Add extension’. In the window that opens up, select ‘ServiceCredentials’ and click OK

Open the new ‘ServiceCredentials’ node. Click on ‘ServiceCertificate’ and copy in the certificate thumbprint you saved earlier from the notepad file into the ‘findValue’ field. Also set the values in the other 3 properties as highlighted in the diagram below

Click OK and Apply to finish configuring the service
If you have non-repudiation requirements, or you used 'Certificate' as the message clientCredential mode stage we configured earlier for any reason, your client application will need to have a certificate added. You can add the certificate to the client application in various ways:
Either to the behaviorConfiguration property of the client endpoint in binding in the app.config after consuming the WCF service:
<endpointBehaviors>
<behavior name="PARolesService.EndPointBehavior">
<clientCredentials>
<clientCertificate findValue=" ade886aa2964bbd8678161102f583e1e894ea560" storeLocation=”LocalMachine” StoreName=”My” x509FindType="FindByThumbprint" />
</clientCredentials>
</behavior>
</endpointBehaviors>
or directly in code in the following way:
cl.ClientCredentials.ClientCertificate.SetCertificate(StoreLocation.LocalMachine, StoreName.My, X509FindType.FindByThumbprint, "ade886aa2964bbd8678161102f583e1e894ea560");
where cl is your client proxy, ServiceReference is the name of the service reference used to add the WCF service, and WSHttpBinding_ServiceHTTPS is your endpoint name in app.config
No comments:
Post a Comment