Setting up Deployment Framework for BizTalk (BTDF) (basic setup for BizTalk 2013) - part 1, page 4
Walkthrough: configuration
In this section I will show how to use the BTDF to deploy a simple BizTalk solution, and how to configure the project for multiple environments
Step Three: Configuring the Deployment.btdfproj file
Open the file Deployment.btdfproj in Visual Studio 2012.
We will start by configuring the item groups. Item groups hold configuration information for the BizTalk artifacts in the application (orchestrations, schemas, etc.).
The following are best practice guidelines for configuring Item groups
- Use a new ItemGroup element for each type of item (i.e. Orchestrations, Schemas, etc.)
- Place the ItemGroup after any PropertyGroup elements and before Import elements
- Use relative paths for LocationPath whenever possible
You should have something similar to the below in your deployment project file for Item groups
<Group>
<ItemGroup>
<PropsFromEnvSettings Include="SsoAppUserGroup;SsoAppAdminGroup" />
</ItemGroup>
<!--!!! TODO !!! -->
<!--Add ItemGroup elements that contain one or more Schemas, Orchestrations, Transforms, etc. elements that describe -->
<!--the specific artifacts in your solution that need to be deployed. Use IntelliSense as a guide. --> <ItemGroup>
<Schemas Include="YourSchemas.dll">
<LocationPath>..\$(ProjectName)\bin\$(Configuration)</LocationPath>
</Schemas>
</ItemGroup>
</Group>
Replace the second ItemGroup node with the following:
<ItemGroup>
<Schemas Include="SmartAlex.BTDFProjects.Common.Schemas.dll">
<LocationPath>..\..\$(ProjectName)\Schemas\bin\$(Configuration)</LocationPath>
</Schemas>
<Maps Include="SmartAlex.BTDFProjects.Common.Maps.dll">
<LocationPath>..\..\$(ProjectName)\Maps\bin\$(Configuration)</LocationPath>
</Maps>
<Orchestrations Include="SmartAlex.BTDFProjects.Common.Orchestrations.dll">
<LocationPath>..\..\$(ProjectName)\Orchestrations\bin\$(Configuration)</LocationPath>
</Orchestrations>
</ItemGroup>
This adds configuration information for the three types of artifacts created as a part of my BTDF solution. If you have used the same folder structure I did, this configuration should work.
Step Four: Deploy and configure the solution
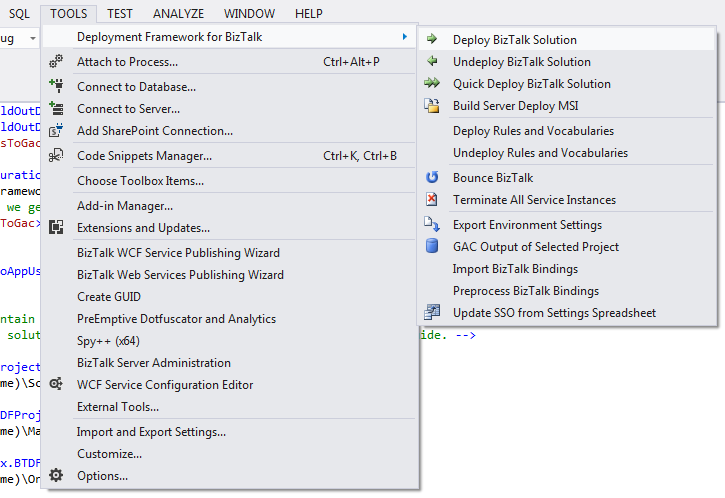
Open the BTDF menu in Visual Studio under the Tools tab of the file menu. Select the 'Deploy BizTalk Solution' option (as in the diagram below)
This will deploy the solution as a BizTalk applicaiton of the same name. Watch the VS output window for the progress of the deployment process.
You will notice that it fails at the bindings stage. This is because we have not yet configured any bindings for this BizTalk application, so it is expected. Go to the BTS admin console and you should see the BizTalk applicaiton successfully deployed with the artifacts we created.
We will now configure the matrix spreadsheet and parameterized master bindings file.
We start by configuring the application bindings in BizTalk. For the purpose of this walkthrough, I will assume you have used the same names I sued for my configuration.
Create a static one-way receive port called 'Rcv_SmartAlexFirstFile' (or any name that suits you. ) using the default XMLReceive pipeline.
Add a receive location called RcvLoc_SmartAlexFirstFile. Configure a file adapter pointing at C:\Projects\BizTalk\BTDFFileDrops\FirstIN.
Create a static one-way send port called Snd_SmartAlexFile using the default PassThruTransmit pipeline. Configure a file adapter pointing to C:\Projects\BizTalk\BTDFFileDrops\OUT
Configure the orchestration by choosing a host instance and binding the logical receive port to Rcv_SmartAlexFirstFile (see image below)
Enable the receive location, start the send port, and start the orchestration.
Now export the bindings to a file. Open the file in a text editor such as NotePad++ and save it as the PortBindingsMaster file in your BTDF deployment folder (C:\Projects\BizTalk\SmartAlex.BTDFProjects.Common\Deployment\PortBindingsMaster.xml in my case).
Now stop the BizTalk application and delete it. Open the BTDF menu in Visual Studio under the Tools tab of the file menu. Select the 'Deploy BizTalk Solution' option and deploy the solution again. the process should run through successfully this time. Start the BizTalk application. It should start and all the bidnings we comnfigured earlier should now be in the deployed solution.
We will now configure multiple environments (we will assume 2 environments for thie purposes of this walkthrough) and run through the multiple environments deployment process'.
Step Five: Configure environments
If you browse to the Deployment\EnvironmentSettings folder, you will notice that as well as the matrix spreadsheet file, 4 settings files have been generated. Those four files have been generated by default based on the four environments in the matrix spreadsheet.
If you open the settings matrix spreadsheet (SettingsFileGenerator.xml) in excel, you will also notice that four environments have been created by default, as well as a default column for direct deployments like the one we just did. We will now create our own two additional environments for this walkthrough, Called DEV1 and Test1.
The aim of the next section is to parameterize our master bindings file by removing any configuration settings such as file locations, hosts, URIs etc. that may change across environments and servers, and replace them with placeholders. The placeholders are then replaced during deployment by the values stored in the matrix file.
Open the settings matrix spreadsheet (Deployment\EnvironmentSettings\SettingsFileGenerator.xml) in excel.
Copy the Test and Production columns and paste them as two new columns at the end of the sheet. Change the column names to Dev1 and Test1 respectively.
Fill in column A and the defaulr column B as shown in the diagram below.
Fill in the two new columns with your own values using the example shown in the diagram below as a guide (changes highlighted in yellow)
Open the PortBindingsMaster.xml file in the Deployment folder using a text editor.
Receive ports
Make the following section changes to receive port Rcv_SmartAlexFirstFile:
Old:
<ReceivePort Name="Rcv_SmartAlexFirstFile" IsTwoWay="false" BindingOption="1">
<Description xsi:nil="true" />
<ReceiveLocations>
<ReceiveLocation Name="RcvLoc_SmartAlexFirstFile">
<Description xsi:nil="true" />
<Address>C:\Projects\BizTalk\BTDFFileDrops\FirstIN\*.xml</Address>
New:
<ReceivePort Name="Rcv_SmartAlexFirstFile" IsTwoWay="false" BindingOption="1">
<Description xsi:nil="true" />
<ReceiveLocations>
<ReceiveLocation Name="RcvLoc_SmartAlexFirstFile">
<Description xsi:nil="true" />
<Address>${RcvURISmartAlexFirstFile}\*.xml</Address>
Old:
<ReceiveHandler Name="BizTalkServerApplication" HostTrusted="false">
New:
<ReceiveHandler Name="${DefaultReceiveHandler}" HostTrusted="false">
Old:
<Tracking>0</Tracking>
New:
<Tracking>${RcvTracking}</Tracking>
Old:
<RouteFailedMessage>false</RouteFailedMessage>
<ApplicationName>SmartAlex.BTDFProjects.Common</ApplicationName>
New:
<RouteFailedMessage>${DefaultRouteFailedMsgSetting}</RouteFailedMessage>
<ApplicationName>SmartAlex.BTDFProjects.Common</ApplicationName>
Send ports
Next, Make the following section changes to send port Snd_SmartAlexFile:
Old:
<Address>C:\Projects\BizTalk\BTDFFileDrops\OUT\%MessageID%.xml</Address>
New:
<Address>${SndURISmartAlexfirstFile}\%MessageID%.xml</Address>
Old:
<RetryCount>3</RetryCount>
New:
<RetryCount>${DefaultSendRetryCount}</RetryCount>
Old:
<OrderedDelivery>false</OrderedDelivery>
New:
<OrderedDelivery>${DefaultOrderedDeliverySetting}</OrderedDelivery>
Old:
<Tracking>0</Tracking>
New:
<Tracking>${SndTracking}</Tracking>
Old:
<RouteFailedMessage>false</RouteFailedMessage>
<ApplicationName>SmartAlex.BTDFProjects.Common</ApplicationName>
New:
<RouteFailedMessage>${DefaultRouteFailedMsgSetting}</RouteFailedMessage>
<ApplicationName>SmartAlex.BTDFProjects.Common</ApplicationName>
Orchestrations
Make the following change to the orchestration ModuleRef SmartAlex.BTDFProjects.Common.Orchestrations
Old:
<Host Name="BizTalkServerApplication" NTGroupName="BizTalk Application Users" Type="1" Trusted="false" />
New:
<Host Name="${DefaultOrchestrationHost}" NTGroupName="${DefaultBizTalkAppGroup}" Type="1" Trusted="false" />
Remove the BizTalk applicaiton from BizTalk server using the admin console. Restart host instances.
Re-deploy the BizTalk solution from Visual Studio using the BTDF menu as we did earlier.
The application should be deployed and configured successfully using the default values (column B in the matrix spreadsheet).
Browse to the Deployment\EnvironmentSettings folder, you will notice that as well as the matrix spreadsheet file, and the previous 4 settings files, two new files have been generated matching the environments we 'created' as in the figure below.
We will now use these files for multi-environment deployment using the BTDF.