Monday, October 13

Null reference exception when trying to open the BTS admin console

BizTalk Administration Console applications node throws the error 'object reference not set to an instance of an object' and refuses to open

I have been having issues with WMI on my dev VM. It literally feels like the VM is a living thing! I come in in the morning and it presents me with a brand new issue to resolve each day. Being on a time-starined project and therefore not having the time to rebuild the entire VM, I keep 'patching' the VM just to cross the finish line. It must be noted that none of the issues affect the actual code I am developing, just the environment in which I have to unit test things before handing over to test.

So the latest one this grey monday morning was this: I started up the VM, opened BizTalk server admin console and presto! I get an error when trying to expand the applications node. The error is basically that dreaded 'object reference not set to an instance of an object' error that every developer using Microsoft / .Net products dreads. The schpiel is a litany of the sort 'microsoft.biztalk.exceptionmessagebox.btsexceptionmessagebox' blah blah blah... but I had no doubt whatsoever (and still have none) that it wouldn't lead me any closer to the real problem.

As it turns out, it is due to the BizTalk WMI namespace being corrupted. I was not surprised to find that out since WMI had been trying to be my nemesis on this project for a few days now, and I have (even surprising myself) somehow managed to limit the time damages and soldier on with the deliveries nonetheless, fixing each new problem it threw at me on a daily basis.

The fix is simple.

Open a command prompt window and browse to the WMI folder (C:\windows\system32\wbem).
Type in the following command (I am using BizTalk 2013, but this problem could happen with any versiobn of BTS, so use the correct folder path)... mofcomp "D:\Program Files (x86)\Microsoft BizTalk Server 2013\Bins32\BTSWMISchema.mof"

That should rebuild your namespaces nicely.

Now try to re-open the BTS admin console and you should be able to see the applications.


Thursday, October 9

Fixing the WMI Connect error when configuring BizTalk Server 2013

Fix: Error occured in CWMI::Connect error during BizTalk Server 2013 configuration

I came across this error randomly whilst configuring a BizTalk server 2013 installation on my dev VM. It led to some head scratching, and ole' google wasn't quite clear with all the solution sposted on there.

After trawling through the suggestions and solving the problme on my VM, I though I'd point out the two step process that worked for me, with references to the relevant posts.

So, my specific problem manifested in a very ugly configuration summary window with only SSO and Rules Engine deployed, and when I clicked on the logfile link in the summary and scrolled through the huge log file (I basically did Ctrl-F and serached for the word 'error'), I found the following error. Error occured in CWMI::Connect
Now, I should mention that this is the second time I got this error on this same VM, and it took me ages to fix the problem the first time. May I also point out that this error seemed to occur both times after a BizTalk server uninstallaion and subsequent re-installation. Apparently, one colleague suggested that stopping the WMI service (Windows Instrumentation Service) before uninstalling BizTalk would avoid this problem. I wish I'd know that earlier, and I am definitely not intending to test the VM now to prove that theory. I decided that this time, I would try to remember the steps that worked the last time and pen them down.

The first bit was this link, obviously written by someone who knows what he's talking about: http://blogs.technet.com/b/configmgrteam/archive/2009/05/08/wmi-troubleshooting-tips.aspx

I basically opened a command window as administrator, copied this bit below and pasted it after relocating thwe prompt to C:\Windows\Syswow64\wbem

FOR /f %s in ('dir /b /s *.dll') do regsvr32 /s %s
Net stop /y winmgmt
FOR /f %s in ('dir /b *.mof *.mfl') do mofcomp %s
Net start winmgmt

The next bit was testing my system32 wbem repository. Using information from this link: http://blogs.technet.com/b/askperf/archive/2012/03/09/unable-to-connect-to-wmi-locally-win32-the-system-cannot-find-the-path-specified.aspx

I moved the command prompt location to C:\Windows\System32\wbem\ and typed the following command:
winmgmt /verifyrepository

This returned the results
wmi repository verification failed
error code 0X8007007E
 
I then used the post by Joson Zhou on this thread: http://social.technet.microsoft.com/forums/windows/en-us/b5f0abba-8a36-457f-912d-81533b6750d4/wmidiag-report-errors

I basically stopped the WMI service, then browsed to C:|Windows\System32\wbem\Repository and copied all the files in there to a safe location, then deleted all the files in the folder.

I then re-started the VM.

I tried to re-configure BizTalk Server 2013 after those steps and voila! It worked.

Thursday, August 21

Fixing the "Session "BizTalkDefaultTrace" failed to start with the..." error

Annoying "Session "BizTalkDefaultTrace" failed to start with the following error: 0xC0000022" error on BizTalk Server machine.


I have just finished a very grey-hair inducing multi-server, high-availability installation of BizTalk server 2013with BAM and ESB on a clustered SQL server infrastructure. (I intend to fully document the process by the way, including all the problems you can potentially face and the solutions to those probmes, as there aren't really any clear documents describing the process from beginning to end out there

As you can imagine, after soldiering my way through the myriad of problems encountered especially with the 'gotchas' of the new ESb toolkit 2.2 installation and configuring procedure keen to make sure that everything (and I mean everything) worked perfectly, and then I re-started all host instances and got the annoying error above. funny thing is, we see this error a lot in Biztalk server installations, but because it is not critica;l, noone fixes it. appraently, the fix is dead easy according to this thread:

It would appear that when you try to start a host instacne that has tracking enabled, BizTalk Server wants to start up a ETW trace session called "BizTalkDefaultTrace". This hangs because the service account user running the host instance does not have the required permissions to create the trace session, and voila, your error appears.

Simply adding your problematic service account users to the windows local group 'Performance Log Users' fixes the problem. I have shown this below in Windows server 2012 R2

Open 'Administrative Tools' from the desktop


Open 'Computer Management'


Open 'Local Users and Groups'


Find the 'Performance Log Users' group


Right-click on it and click on 'Properties'


Add each of the service account users running the problematic host instances


This should fix the issue.

Tuesday, August 12

ESB Portal Error Could not load type 'System.ServiceModel.Activation.HttpModule' ...

Fixing the “Could not load type 'System.ServiceModel.Activation.HttpModule' from assembly 'System.ServiceModel, Version=3.0.0.0, Culture=neutral, PublicKeyToken=b77a5c561934e089'’ error for a new installation of the ESB portal on BizTalk 2013:

Open IIS Manager

Open the ‘Default Website’ node
Click on the ESB.Portal application
Go the right hand pane and click on ‘Browse *:80 (http)’
If you get an error page with the message “Could not load type 'System.ServiceModel.Activation.HttpModule' from assembly 'System.ServiceModel, Version=3.0.0.0, Culture=neutral, PublicKeyToken=b77a5c561934e089'’ then use the following steps to fix it.
  1. Click on the IIS root node
  2. Click on ‘Modules’ in the middle pane
  3. In the middle pane, under the ‘Name’ column, find the ‘ServiceModel’ entry (not the ‘ServiceModel-4.0’ entry)
  4. Click on ‘Remove’ in the right pane to remove it
  5. Click on the ‘Default Website’ node
  6. In the middle pane, double-click on ‘Handler Mappings’
  7. Remove current the Managed Handler for svc-integrated (might be called svc-integrated 2.0)
  8. In the right pane, click on ‘Add Managed Handler’
  9. Enter the following parameters:
  • Request Path: *.svc
  • Type: System.ServiceModel.Activation.ServiceHttpHandlerFactory, System.ServiceModel.Activation, Version=4.0.0.0, Culture=neutral, PublicKeyToken=31bf3856ad364e35
  • Name: svc-integrated-4.0
Click on ‘OK’

Try to browse the ESB Portal again. It should be fine now.

Thursday, July 17

Undocumented fix to the.BizTalk.Interop.SSOClient, Version=7.0.2300.0 error

Undocumented fix to the.BizTalk.Interop.SSOClient, Version=7.0.2300.0 error:

"System.IO.FileNotFoundException: Could not load file or assembly 'Microsoft.BizTalk.Interop.SSOClient, Version=7.0.2300.0, Culture=neutral, PublicKeyToken=31bf3856ad364e35' or one of its dependencies. The system cannot find the file specified

This one did my head in for a while, and I hope this post helps someone. I got htis error after an installaion of BizTalk server 2013, but unlike every other post I found which mentioned this issue, I had not done an upgrade... it was a fresh install!

The error popped up when I tried to browse a wcf service I published using the BizTalk WCF service publishing wizard. I then did what all the posts said anyway, which is still the recommended firts step for anyone experiencing this issue: Try to upgrade SSO manually from the BizTalk installaiton media. I will not go into details, but below are two posts suggesting two different fixes which did NOt work for my scenario: One talks about changing applicaiton pool configuraitons and registering asp.net for IIS and the other talks about the upgrade I mentioned above.

http://blogs.msdn.com/b/joscot/archive/2013/08/14/biztalk-2013-hosted-wcf-service-fails-because-it-could-not-load-microsoft-biztalk-interop-ssoclient.aspx

http://esbguru.wordpress.com/2013/12/01/could-not-load-assembly-microsoft-biztalk-interop-ssoclient-after-upgrade-to-biztalk-2013/

For my scenario, none of these approaches fixed the problem so I started some investigation:

First checked GAC (I am on a 64 bit machine so I checked C:\Windows\Microsoft.Net\GAC_MSIL). I found the version 4 DLL. No other verison sof this assembly were present in any of my GAc locaitons. This meant that for some reason, the upgrade ghad failed to upgrade the DLL in GAC.

I checked a colleague's working machine and found that he had the correct v7 DLL in GAC.

I copied the correct DLL to my local and GAC'ed it using the gacutil tool (to ensure correct folder GAC'ing). I now had both the verison 4 and the version 7 DLLs in my GAC

I then re-started IIS and re-tried the service.

All wotked perfectly after that.


Wednesday, July 9

Setting up Deployment Framework for BizTalk (BTDF) (basic setup for BizTalk 2013) - v

Setting up Deployment Framework for BizTalk (BTDF) (basic setup for BizTalk 2013) - part 1, page 5


Previous: Walkthrough: configuration
 

Walkthrough: deploy environments
In this section I will show how to use the BTDF to deploy the BizTalk solution to multiple environments


Step Six: Customize the MSI deployment process
To make the process of deploying into separate environments using a deployment wizard as error-free as possible, it is useful to customise the user experience for the authorised personnel (BizTalk administrators) who will be doing the deployment. This can be accomplished by using the BTDF msi deployment wizard, a BTDF installation tool for deploying MSIs created by BTDF during the deployment process

We have complete control over which pages appear in the wizard, and in what order.

The files InstallWizard.xml and UnInstallWizard.xml in the Deployment folder define all of the pages that the wizard will display during, respectively, deployment and undeployment. The goal of the wizard is to define environment variables before launching MSBuild so that they can be referenced during deployment. We will use those environment variables/MSBuild properties to control the deployment.

At least two environment variables called ENV_SETTINGS and BT_DEPLOY_MGMT_DB must be defined in the Installwizard.xml file when MSBuild is launched on the server to deploy. These are created by default by the BTDF project creation process. They choose the bindings and do the actual server deployment respectively. We will examine these two.

Open the InstallWizard.xml file using a text editor. Make sure it is similar to the one pasted below and save the file:

<?xml version="1.0" encoding="utf-8" ?>
<!--
    Deployment Framework for BizTalk
    Copyright (C) 2008-14 Thomas F. Abraham, 2004-08 Scott Colestock
-->
<!-- Each SetEnvUIConfigItem element defines a single page in the wizard that appears during a server deployment. -->
<!-- The EnvironmentVarName element specifies the name of an environment variable that will contain the value of the -->
<!-- user's selection. Each environment variable automatically becomes an MSBuild property that you may reference in -->
<!-- your .btdfproj file. -->
<SetEnvUIConfig xmlns:xsd="
http://www.w3.org/2001/XMLSchema" xmlns:xsi="http://www.w3.org/2001/XMLSchema-instance">
   <DialogCaption>SmartAlex.BTDFProjects.Common</DialogCaption>
   <SetEnvUIConfigItem>
      <PromptText>Enter the domain-qualified account name used by the BizTalk host instance to read/write from/to FILE port physical paths:</PromptText>
      <PromptValue />
      <ValueType>Text</ValueType>
      <EnvironmentVarName>BTSACCOUNT</EnvironmentVarName>
   </SetEnvUIConfigItem>
  <SetEnvUIConfigItem>
    <PromptText>Select the XML file that contains configuration information specific to this environment:</PromptText>
    <PromptValue></PromptValue>
    <ValueType>FileSelect</ValueType>
    <EnvironmentVarName>ENV_SETTINGS</EnvironmentVarName>
  </SetEnvUIConfigItem>
  <SetEnvUIConfigItem>
      <PromptText>Is this the LAST server in the BizTalk Group you are deploying to?    
If so, BizTalk assemblies will be deployed to the BizTalk Management Database.
</PromptText>
      <Caption>This is the LAST server in the BizTalk Group</Caption>
      <PromptValue>true</PromptValue>
      <ValueType>Checkbox</ValueType>
      <EnvironmentVarName>BT_DEPLOY_MGMT_DB</EnvironmentVarName>
   </SetEnvUIConfigItem>
</SetEnvUIConfig>


The configuration file is actually quite self-explanatory. The <SetEnvUIConfig> nodes define each page of the wizard. Each page allows you to ask a question and select the type of input expected back in response to the question. In the sample above, we are more or less using the default BTDF config settings.

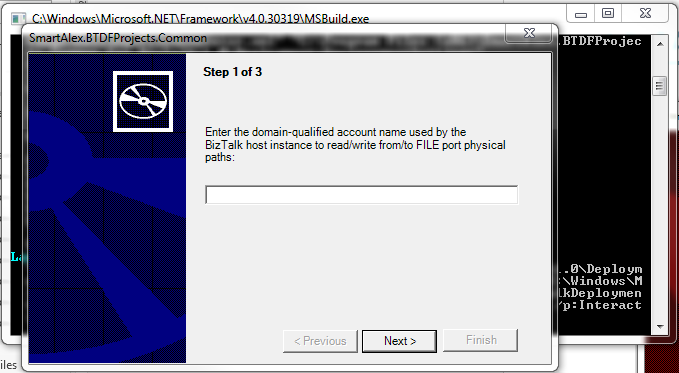
The first page asks for a domain-qualified account to be used in the chosen environment. Domain-qualified accounts are expected since the environments are tecnhically not expected to be on the same computer.

The second page asks for the specific Settings file (created earlier from the matrix spreadsheet and PortbindingsMaster.xml) we want to use to configure the BizTalk application when deploying to the chosen environment

The third page is really more relevant for multi-server environments (deploying to a BizTalk group), but we still need to tick the box for single server environments to tell BTDF that this is a single server environment

Note: to undeploy using the wizard, at least one environment variable must be defined in the Uninstallwizard.xml file: BT_DEPLOY_MGMT_DB.


Step Seven: Deploy environment(s)
The deployment approach we are going to explore in this walkthrough is the server deploy msi approach. This involves building a composite msi file which includes references to all the environments we have configured in the settings matrix spreadsheet. the msi is used in conjunction with the corresponding auto-generated settings file to complete the deployment to the target environment.
 
Once the msi is created by BTDF, the administrator is prompted during the deployment process to specify the environment being deployed to, and the settings are then read from a file specified during the same deployment process
 
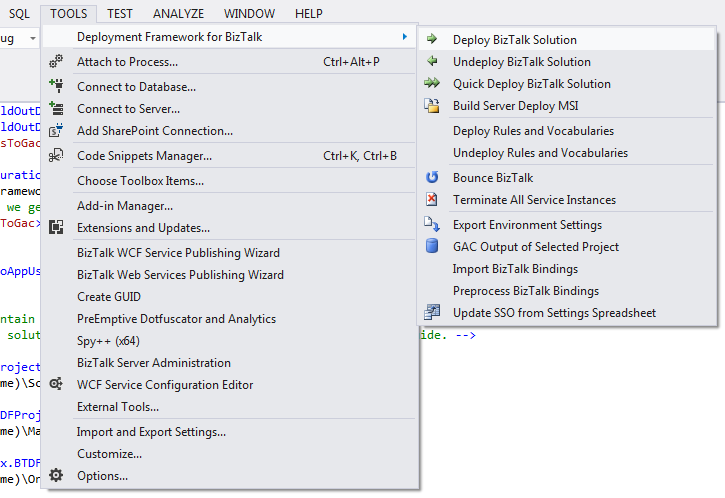
To start, open the BTDF menu in Visual Studio under the Tools tab of the file menu. Select the 'Build Server Deploy MSI' option (as in the diagram below)
 
 
Check the output window to make sure the process completes successfully.
 
 
Now open the Deployment\bin\debug folder. There should be two files in the folder: an MSI file called 'SmartAlex.BTDFProjects.Common-1.0.0.msi' for installing your application, and an installation script file called 'Install-SmartAlex.BTDFProjects.Common-1.0.0.bat', for interactive installations. We will use the interactive installation option for more control over the installation and deployment.

For the walkthrough, we are assuming we will be deploying to the Dev1 BiszTalk Server environment.

Copy the two files to a staging location on your target  (DEV1 environment) server (or you can use the same machine for the walkthrough). also copy the file Exported_Dev1Settings.xml from Deployment\environmentSettings to the staging location on your target server.

Double-Click the Install-SmartAlex.BTDFProjects.Common-1.0.0.bat file to begin the installation...

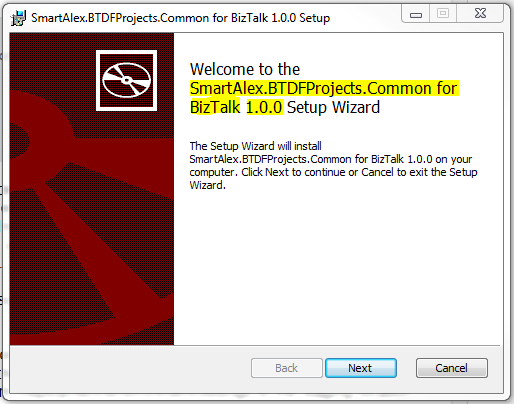
The wizard starts with the interactive installation screen. Click Next.


Note that the version number and name of the product (highlighted above) can be customised from the deployment project file (Deployment.btdfproj) in the sections shown below

<ProductVersion>1.0.0</ProductVersion>
    <ProductId>de607a47-32bc-4804-b984-8219dfdf6d31</ProductId>
    <!-- BizTalk App Version Upgrade -->    <ProductName>SmartAlex.BTDFProjects.Common for BizTalk</ProductName>


A license agreement screen is displayed next. Tick the acceptance box and click next to move on.

The next screen asks you to specify the installation folder to which you would like to install the application on the server. The default is okay for this walkthrough, but you can change this to suit your solution requirements

Click 'Install' on the next screen to begin the installation.

Click ‘Install’ to begin the installation. The application is installed onto the target server. As a part of the installation completion screen you now have the option to specify if you wish to deploy the BizTalk application to Biztalk server. Tick the box as highlighted in the diagram below and click ‘Finish’


The deploymrent process will now start. The first screen asks you to specify a domain-qualified account for running nBiztalk processes. This should be a service account used for running the in-process hosts in Biztalk server. Enter the account and click Next.


The next screen asks you to specify the environment settings file for the target environment (in the Deployment\environmentSettings folder). Browse to the correct Settings file for the target environment and click Next.


The last screen asks you to specify if this is the last server in the group. This is referring to a multi-server BizTalk group. This is important when deploying to a a multi-server BizTalk group. For a single BizTalk server, there is only one server in the BizTalk group, so you must check the checkbox before clicking Finish to start the deployment script. When deploying to a BizTalk group, pay careful attention to the sequence in which you deploy to each server and untick for each server until you come to the last server.

Leave the box ticked for this walkthrough and click 'Finish'. this will start the deployment script, which deploys the application into Biztalk server on the target environment with the correct (selected) settings for that environment.


When the deployment finishes, it will display a message indicating success or failure.  It's possible that some warnings will appear.  They are worth reviewing but generally don't indicate a significant problem.

Once the script has run successfully, open BizTalk server admin, and you should be able to view the fully configured application in BizTalk.


Previous: Walkthrough: configuration

Setting up Deployment Framework for BizTalk (BTDF) (basic setup for BizTalk 2013) - iv

Setting up Deployment Framework for BizTalk (BTDF) (basic setup for BizTalk 2013) - part 1, page 4


Previous: Walkthrough: project

Walkthrough: configuration
In this section I will show how to use the BTDF to deploy a simple BizTalk solution, and how to configure the project for multiple environments


Step Three: Configuring the Deployment.btdfproj file
Open the file Deployment.btdfproj in Visual Studio 2012.

We will start by configuring the item groups. Item groups hold configuration information for the BizTalk artifacts in the application (orchestrations, schemas, etc.).

The following are best practice guidelines for configuring Item groups


  • Use a new ItemGroup element for each type of item (i.e. Orchestrations, Schemas, etc.)
  • Place the ItemGroup after any PropertyGroup elements and before Import elements
  • Use relative paths for LocationPath whenever possible
You should have something similar to the below in your deployment project file for Item groups

<Group>
 <ItemGroup>
  <PropsFromEnvSettings Include="SsoAppUserGroup;SsoAppAdminGroup" />
 </ItemGroup>
 <!--!!! TODO !!! -->
 <!--Add ItemGroup elements that contain one or more Schemas, Orchestrations, Transforms, etc. elements that describe -->
 <!--the specific artifacts in your solution that need to be deployed. Use IntelliSense as a guide. -->
 <ItemGroup>
  <Schemas Include="YourSchemas.dll">
   <LocationPath>..\$(ProjectName)\bin\$(Configuration)</LocationPath>
  </Schemas>
 </ItemGroup>
</Group>


Replace the second ItemGroup node with the following:

<ItemGroup>
    <Schemas Include="SmartAlex.BTDFProjects.Common.Schemas.dll">
      <LocationPath>..\..\$(ProjectName)\Schemas\bin\$(Configuration)</LocationPath>
    </Schemas>
    <Maps Include="SmartAlex.BTDFProjects.Common.Maps.dll">
      <LocationPath>..\..\$(ProjectName)\Maps\bin\$(Configuration)</LocationPath>
    </Maps>
    <Orchestrations Include="SmartAlex.BTDFProjects.Common.Orchestrations.dll">
      <LocationPath>..\..\$(ProjectName)\Orchestrations\bin\$(Configuration)</LocationPath>
    </Orchestrations>
  </ItemGroup>


This adds configuration information for the three types of artifacts created as a part of my BTDF solution. If you have used the same folder structure I did, this configuration should work.


Step Four: Deploy and configure the solution
Open the BTDF menu in Visual Studio under the Tools tab of the file menu. Select the 'Deploy BizTalk Solution' option (as in the diagram below)


This will deploy the solution as a BizTalk applicaiton of the same name. Watch the VS output window for the progress of the deployment process.
 
You will notice that it fails at the bindings stage. This is because we have not yet configured any bindings for this BizTalk application, so it is expected. Go to the BTS admin console and you should see the BizTalk applicaiton successfully deployed with the artifacts we created.


We will now configure the matrix spreadsheet and parameterized master bindings file.
 
We start by configuring the application bindings in BizTalk. For the purpose of this walkthrough, I will assume you have used the same names I sued for my configuration.
  • Create a static one-way receive port called 'Rcv_SmartAlexFirstFile' (or any name that suits you. ) using the default XMLReceive pipeline.
  • Add a receive location called RcvLoc_SmartAlexFirstFile. Configure a file adapter pointing at C:\Projects\BizTalk\BTDFFileDrops\FirstIN.
  • Create a static one-way send port called Snd_SmartAlexFile using the default PassThruTransmit pipeline. Configure a file adapter pointing to C:\Projects\BizTalk\BTDFFileDrops\OUT
  • Configure the orchestration by choosing a host instance and binding the logical receive port to Rcv_SmartAlexFirstFile (see image below)
 
Enable the receive location, start the send port, and start the orchestration.
 
Now export the bindings to a file. Open the file in a text editor such as NotePad++ and save it as the PortBindingsMaster file in your BTDF deployment folder (C:\Projects\BizTalk\SmartAlex.BTDFProjects.Common\Deployment\PortBindingsMaster.xml in my case).
 
Now stop the BizTalk application and delete it. Open the BTDF menu in Visual Studio under the Tools tab of the file menu. Select the 'Deploy BizTalk Solution' option and deploy the solution again. the process should run through successfully this time. Start the BizTalk application. It should start and all the bidnings we comnfigured earlier should now be in the deployed solution.
 
We will now configure multiple environments (we will assume 2 environments for thie purposes of this walkthrough) and run through the multiple environments deployment process'.
 
 
Step Five: Configure environments
If you browse to the Deployment\EnvironmentSettings folder, you will notice that as well as the matrix spreadsheet file, 4 settings files have been generated. Those four files have been generated by default based on the four environments in the matrix spreadsheet.
 
If you open the settings matrix spreadsheet (SettingsFileGenerator.xml) in excel, you will also notice that four environments have been created by default, as well as a default column for direct deployments like the one we just did. We will now create our own two additional environments for this walkthrough, Called DEV1 and Test1.
 
The aim of the next section is to parameterize our master bindings file by removing any configuration settings such as file locations, hosts, URIs etc. that may change across environments and servers, and replace them with placeholders. The placeholders are then replaced during deployment by the values stored in the matrix file.
 
Open the settings matrix spreadsheet (Deployment\EnvironmentSettings\SettingsFileGenerator.xml) in excel.
 
Copy the Test and Production columns and paste them as two new columns at the end of the sheet. Change the column names to Dev1 and Test1 respectively.
Fill in column A and the defaulr column B as shown in the diagram below.
 
 
Fill in the two new columns with your own values using the example shown in the diagram below as a guide (changes highlighted in yellow)
 
 
Open the PortBindingsMaster.xml file in the Deployment folder using a text editor.
 
Receive ports
Make the following section changes to receive port Rcv_SmartAlexFirstFile:
 
Old:
<ReceivePort Name="Rcv_SmartAlexFirstFile" IsTwoWay="false" BindingOption="1">
      <Description xsi:nil="true" />
      <ReceiveLocations>
        <ReceiveLocation Name="RcvLoc_SmartAlexFirstFile">
          <Description xsi:nil="true" />
          <Address>C:\Projects\BizTalk\BTDFFileDrops\FirstIN\*.xml</Address>
New:
<ReceivePort Name="Rcv_SmartAlexFirstFile" IsTwoWay="false" BindingOption="1">
      <Description xsi:nil="true" />
      <ReceiveLocations>
        <ReceiveLocation Name="RcvLoc_SmartAlexFirstFile">
          <Description xsi:nil="true" />
          <Address>${RcvURISmartAlexFirstFile}\*.xml</Address>
 
Old:
<ReceiveHandler Name="BizTalkServerApplication" HostTrusted="false">
New:
<ReceiveHandler Name="${DefaultReceiveHandler}" HostTrusted="false">
 
Old:
<Tracking>0</Tracking>
New:
<Tracking>${RcvTracking}</Tracking>
 
Old:
<RouteFailedMessage>false</RouteFailedMessage>
      <ApplicationName>SmartAlex.BTDFProjects.Common</ApplicationName>
New:
<RouteFailedMessage>${DefaultRouteFailedMsgSetting}</RouteFailedMessage>
      <ApplicationName>SmartAlex.BTDFProjects.Common</ApplicationName>
 
Send ports
Next, Make the following section changes to send port Snd_SmartAlexFile:
 
Old:
<Address>C:\Projects\BizTalk\BTDFFileDrops\OUT\%MessageID%.xml</Address>
New:
<Address>${SndURISmartAlexfirstFile}\%MessageID%.xml</Address>
 
Old:
<RetryCount>3</RetryCount>
New:
<RetryCount>${DefaultSendRetryCount}</RetryCount>
 
Old:
<OrderedDelivery>false</OrderedDelivery>
New:
<OrderedDelivery>${DefaultOrderedDeliverySetting}</OrderedDelivery>
 
Old:
<Tracking>0</Tracking>
New:
<Tracking>${SndTracking}</Tracking>
 
Old:
<RouteFailedMessage>false</RouteFailedMessage>
      <ApplicationName>SmartAlex.BTDFProjects.Common</ApplicationName>
New:
<RouteFailedMessage>${DefaultRouteFailedMsgSetting}</RouteFailedMessage>
      <ApplicationName>SmartAlex.BTDFProjects.Common</ApplicationName>
 
Orchestrations
Make the following change to the orchestration ModuleRef SmartAlex.BTDFProjects.Common.Orchestrations
 
Old:
<Host Name="BizTalkServerApplication" NTGroupName="BizTalk Application Users" Type="1" Trusted="false" />
New:
<Host Name="${DefaultOrchestrationHost}" NTGroupName="${DefaultBizTalkAppGroup}" Type="1" Trusted="false" />
 
Remove the BizTalk applicaiton from BizTalk server using the admin console. Restart host instances.
 
Re-deploy the BizTalk solution from Visual Studio using the BTDF menu as we did earlier.
The application should be deployed and configured successfully using the default values (column B in the matrix spreadsheet).
 
Browse to the Deployment\EnvironmentSettings folder, you will notice that as well as the matrix spreadsheet file, and the previous 4 settings files, two new files have been generated matching the environments we 'created' as in the figure below.
 
 
We will now use these files for multi-environment deployment using the BTDF.
 
 
Previous: Walkthrough: project


Setting up Deployment Framework for BizTalk (BTDF) (basic setup for BizTalk 2013) - iii

Setting up Deployment Framework for BizTalk (BTDF) (basic setup for BizTalk 2013) - part 1, page 3


Previous: Structure and Components

Walkthrough: project
In this section I will start showing how to configure and deploy a simple BizTalk solution using the BTDF.


Step One: Create your BizTalk solution
Creating a BizTalk schemas solution is out of the scope of this document as the assumption is that you are already above that stage.

I will use a BizTalk solution I created earlier containing a schemas project called SmartAlex.BTDFProjects.Common.Schemas, a BizTalk  maps project called SmartAlex.BTDFProjects.Common.Maps and a BizTalk ochestrations project called SmartAlex.BTDFProjects.Common.Orchestrations. Following the naming conventions explained earlier, the solution will look like the figure below. Also note that the solution name is my target BizTalk application name for deployment.

 
The Visual Studio solution view

The map is a simple map mapping from one schema to the other, and the orchestration simply puts the flow together. It will be picking the request from a  file receive and dropping the mapped message in a file send location.


Step Two: Create your BTDF project
Next, I add a Deployment Framework For BizTalk project to the solution.


Right-click on the solution and 'Add' a new project.


Select 'Deployment Framework for BizTalk Project'.


Select the deployment options (in this case, the default options are fine).
Click on 'Create Project'.


Click on 'OK' once the project is created.

In Visual Studio, you now need to add the project items manually to the solution as described below. This is because the Deployment Framework does not include a custom Visual Studio project type (like. csproj)

Add a new solution folder called 'Deployment'

Browse to the folder you specified when adding the new BTDFproject to your solution. You should see the created components in that folder
Add all the items in the created Deployment root folder to the new solution folder (see diagram below)


The diagram above shows the solution view after adding auto-generated deployment items

If you browse to the project folder again, you should identify the following files

Deployment\Deployment.btdfproj: This is the BTDf deployment project file which holds the configuration information. This file is already described briefly above

Deployment\PortBindingsMaster.xml: This is the parameterized master bindings file which will be used to hold the variable parameters (tokens) for environment-specific bindings settings

Deployment\EnvironmentSettings\SettingsFileGenerator.xml: This is the settings file matrix spreadsheet which will hold the actual environment-spoecific values from which the various environment -specific values will be read. These values will then replace the tokenized (parameterized) variables in the master bindings file, during the creation of the actual bindings files for each environment

We now need to configure the components


Previous: Structure and Components

Setting up Deployment Framework for BizTalk (BTDF) (basic setup for BizTalk 2013) - ii

Setting up Deployment Framework for BizTalk (BTDF) (basic setup for BizTalk 2013) - part 1, page 2


Previous: Introduction and Installation

Structure and Components
The BTDF uses MSBuild as the underlying build engine. For this reason, it works very well with MSBuild nomenclature (naming conventions) and the advice is to follow the naming conventions outlined below for easier setup and use.

Structure

The Deployment Project file
The starting point is the btdfproj file which is created for you when you add a new BTDF project. All configuration (MSBuild commands) is done in this file.

Just like BizTalk (.btproj), C# (.csproj) or VB.NET (.vbproj) projects, the Deployment Framework for BizTalk is based around a project file in MSBuild XML format. A Deployment Framework for BizTalk project file carries a .btdfproj extension and can be edited with any text or XML editor.

For full information on the project file and configuration, please see http://www.tfabraham.com/BTDFDocs/V5_0/DeploymentFrameworkForBizTalkDocs.html?WorkingwithBindingsFiles.html.

Naming conventions
Although the BTDF is extremely flexible with naming in the newer versions, it is advisable that all users follow an agreed naming convention for BizTalk artifacts and shared components to make configuration easier.

To avoid extra configuration, the following guidelines on naming are specified: (you can also get this information at http://www.tfabraham.com/BTDFDocs/V5_0/DeploymentFrameworkForBizTalkDocs.html?WorkingwithBindingsFiles.html).


  1. The name of the folder containing a BizTalk project is identical to the project’s output DLL name (without the extension). So for example, a project called SmartAlex.BTDFProjects.FirstProject.Common should be in a folder of the same name, and the DLL will be SmartAlex.BTDFProjects.FirstProject.Common.dll.
  2. Each project must build to a bin\Debug and bin\Release folder under the project folder.For example, if you have a BizTalk project in a folder named SmartAlex.BTDFProjects.FirstProject.Orchestrations, then it must build to SmartAlex.BTDFProjects.FirstProject.Orchestrations\bin\Debug\SmartAlex.BTDFProjects.FirstProject.Orchestrations.dll (or bin\Release). This is the default for BizTalk 2009 and newer versions anyway.
  3. Split BizTalk projects by artifact type: a project for orchestrations, a project for schemas, a project for maps and so on (SmartAlex.BTDFProjects.FirstProject.Orchestrations, SmartAlex.BTDFProjects.FirstProject.Schemas etc.). This model is built into the Deployment Framework and is the preferred structure.
A typical example of such a project naming structure is:
SmartAlex.BTDFProjects.FirstProject.Orchestrations
SmartAlex.BTDFProjects.FirstProject.Schemas
SmartAlex.BTDFProjects.FirstProject.Maps
SmartAlex.BTDFProjects.FirstProject.Pipelines
SmartAlex.BTDFProjects.FirstProject.CommonComponents
 
From a VS 2012 perspective, these would all be projects called Orchestrations, Schemas, Maps etc under the solution SmartAlex.BTDFProjects.FirstProject with namespaces SmartAlex.BTDFProjects.FirstProject.Orchestrations, SmartAlex.BTDFProjects.FirstProject.Maps etc.
 
The Deployment Framework pre-defines the folder names for orchestrations, schemas, etc. as $(ProjectName).Orchestrations, $(ProjectName).Schemas, etc. Tthe definition for the ProjectName property is near the top of the .btdfproj file. 
Using these conventions, and taking a schemas assembly as an example, the Deployment Framework can then fill in parameters automatically within the .btdfproj file in the sample configuration node below:
<ItemGroup>
<Schemas Include="$(ProjectName)Schemas.dll">
<LocationPath>..\$(ProjectName).Schemas\bin\$(Configuration)</LocationPath>
</Schemas>
</ItemGroup>
 
 Where $(ProjectName) is of the format  SmartAlex.BTDFProjects.FirstProject and this will also be the BizTalk server application name.
 
Components
There are various components installed and generated on your computer after the installation of the BTDF. These components tie together the framework to create the overall deployment process. I have discussed the main components you should understand for a basic setup below:

The Deployment folder
This is a solution folder called Deployment which should be created for each BizTalk solution (This solution should also be your BizTalk server application as explained above under 'Structure').

This folder will contain the deployment artifacts and sub-folders.
Sub-folders in the Deployments folder can include:
• EnvironmentSettings: Contains the settings matrix file

• BRE: Contains Business rules engine artifacts such as policies and vocabularies
• Bin\Debug: Contains msi files created as a result of deployments in the debug mode
• Bin\Release: Contains msi files created from deployments in the release mode.


Deployment Project File(Deploy.btdfproj)
As mentioned above, a deployment project file (.btdfproj extension) is created to hold the instructions which BTDF uses in compiling the solution projects and components.


This file uses MSBuild syntax and the MSBuild engine to build and deploy the BizTalk solution artifacts. All actions carried out by the Deployment Framework are driven by MSBuild. This file will be in the Deployment folder.

Settings Matrix File (SettingsFileGenerator.xml)
The Deployment Framework builds upon an open-source tool known as the Environment Settings Manager to help tackle the complexity involved in managing the BizTalk bindings process across environments.

The core of the solution is a simple, easy-to-use Excel workbook. In this workbook, you may list out all of your runtime environments (Dev, Test1, Test2, UAT, Prod etc.) and all of your runtime settings (WCF service URLs, FTP server addresses and details etc.) in a simple matrix that also contains the actual values for each combination.

This gives you instant documentation and a simple method with which to maintain your settings and their values across environments and even across teams (test team, support team, dev team etc.).
A parameterized master bindings file is used in conjunction with the matrix for each BizTalk application, and it fills in values from the matrix during the deployment process as explained below.

All you need to get started with the Environment Settings Manager workbook is Excel 2003 or newer.

This file will be in the Deployment\EnvironmentSettings folder.


Parameterized Master Bindings File (PortbindingsMaster.xml)
A parameterized bindings file is an extension of the BizTalk bindings file concept which allows the same file to be used across multiple deployment environments.

It is an environment-neutral XML bindings file template stored as PortBindingsMaster.xml within the deployment folder. It simply holds all the configuration parameters for an application's bindings using custom variable names, and replaces those variables in a bindings file with the actual values it stores. The values are looked up from the matrix file based on their variable names and automatically filled in during deployment once the environment has been selected. It is used to collate environment bindings information for re-usability.

This file will be in the Deployment folder.


Previous: Introduction and Installation